All work relating to Unit 1
1.1
Gum Drop
Research.
I did some research looking at candy from the 1800’s since Hansel and Gretel was based then. Looking on the internet for candy is a necessary step because you could be putting candy that hasn’t even been invented in the 1800’s. The most popular candy’s in the 1800’s were mostly hard candy’s like rock and candy canes but gummy drops just came around also. Taffy also came around in the early 1800’s. I decided to go with a gum drop and a lolly pop.

This first thing I done in 3ds max was make a cone so I was able to morph it after into a cone eventually. I used a cone as it seemed like the most simple and easiest shape to form into a gum drop.
This is the end result of morphing using the 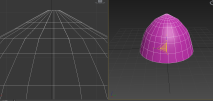 chamfer tool mostly to be able to add more vertex’s so the drop is more realistic.

Going into the modify list and selecting Unwrap UVW will bring up this which is the main tool for preparing your model for texturing.

This is the result after organizing the UVW template meaning its ready to be textured.
 Using textures.com I looked around for a good texture to use for my model but finding a gumdrop one was rather difficult so I had to get rather creative when think of another texture which could also work as a gumdrop. After looking at a various amount of ideas I came to using this glass texture which fitted rather well.

This is the template that you apply the textures to in Photoshop. Each part of it is a different part of the 3d model like the top left part wraps around the entire shape and the top right it peak of the model and the bottom part is the bottom of the model.

This is what it looks like after applying the texture to the template so its now ready to move into 3ds max.

This is the final result of the shape, i’m rather happy with how it turned out but still think i could of improved the texturing a bit more I just didn’t know how i would do that.
Lolly

Using the exact same technique for the lolly as i used for gumdrop and this was my final result. Did i struggle with this? Yes because it had been over 3 weeks since i last used 3ds max before this task but making both of these helped me use this program again. What could i have done better? I struggled with the lolly a lot more than the gumdrop since i used two shapes for it but it was a experience.
For Lolly – http://www.textures.com/download/bricklargebare0319/120750?q=plastic
For gumdrop – http://www.textures.com/download/splattercolored0017/31650?q=coloured
Gingerbread House
Before I even could start making my house I need a idea of how to make it so since my environment is based in 1800’s Germany with a horror genre I done some research into late 1800’s and early 1900’s horror in Germany. I found a piece called “the cabinet of Dr. Caligari” It was a piece of German horror Expressionism.


Looking at these images you can notice one thing, which is they both have old shaped buildings with rather sharp edges so after looking at these images I then needed to do some research into German styled Gingerbread house. I looked into Lebkuchenhaus (Gingerbreadhouse) and i thought that the style of these houses would go well in my environment.


Looking at these houses i really liked the style of them so decided to design my gingerbread house based off these images and research i done into horror in Germany.
Making the house was rather complex as it contained a lot of different shapes that we needed to include when making it. So we started off by making a ChamferBox as they add nice detail and make it look more genuine. After getting my wall sorted out i then needed to think what would hold it together? Which would be Icing so i needed a capsule to act as 
 .
.
I added Noise to the capsule to give it a more realistic look so it could be more of a realistic look. After sorting out the main things of my house i could then start making it.

This is the end result before adding details and a door to my house.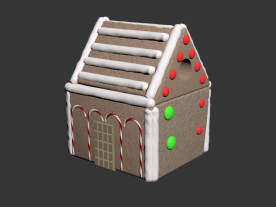

This is the final result of my house after adding details and a door. I also added one of my previous models i made, i used the candy cane as i thought it made a nice decoration to the house. Some of the things i think i could of done better is try and add some kind of snowy effect on the top of the house but that didn’t really fit well with the genre of my environment so i decided to leave it out. I don’t the house fits the expectations of my horror genre really well but I have added certain effects in my environment to still give it a horror feel.
Horror- http://screenprism.com/insights/article/why-is-the-cabinet-of-dr.-caligari-considered-the-definitive-german-express
Horror- http://www.empireonline.com/movies/cabinet-dr-caligari/review/
Tree
With making my tree i wanted to try and make it fir the the horror theme in the woods so i done some research into eerie woods as that was the kind of look i was going for.


After looking at images online i noticed that one of he most common things is that none of the tress have leafs on them so i decided to do that with my tree as well.
With this task we was told to put a reference image behind our model to help us shape our tree better but i couldn’t find any pictures of the type of tree i wanted on its own I still used the images i found when i researched to help me better design my tree.

We first started off with making a cylinder to act as the trunk as our tree and adding to 28 height segments.
 The next step in making our tree was to create a line which is in shapes then after making a line we then needed go back onto our cylinder and go onto the modify tab and select Path Deform (WSM) then click pick path which will then ask you to select another model to attach the cylinder to. After you sort out your main trunk you need to start working on the main branches so you would draw lines coming from the center of the tree and repeat the same steps for each branch you make. Once you have you done all of your main branches done you needed to then add taper to each one to give it a point and make it look more realistic.
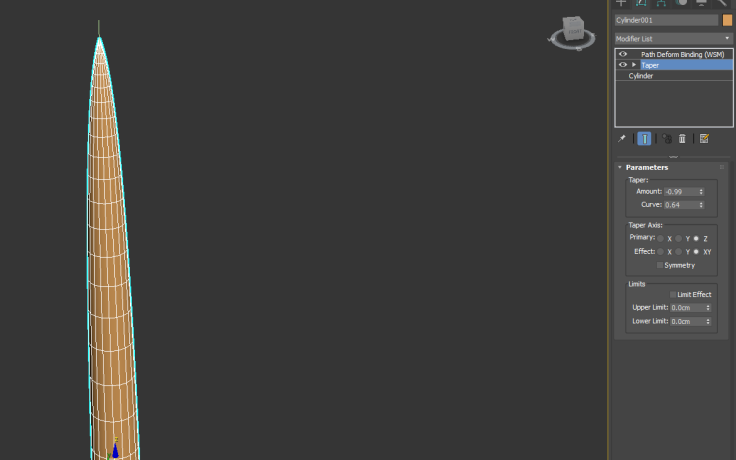
At this point you need to start looking for a texture for your tree. Using textures.com i looked for a suitable texture for my tree. http://www.textures.com/download/3dscans0062/127610?q=Tree This is the texture i used for me tree as its a nice shade of dark which is what i want for my environment as i have a horror genre.

This is my tree trunk after applying the texture to it. I’m rather happy with how it turned out and i decided to keep the texture how it is. After getting the texture for your trunk and main branches you then need to make the leafs. I went back onto textures.com and searched for branches and since i wanted my tree to look dead i was looking for a branch containing no leafs and i found the perfect texture for it.
http://www.textures.com/download/branches0015/86447?q=branch
The thing about this texture that made it perfect is because there was not a lot of dead branch textures so i was really happy when i found this and decided to use for my branch. Now you can start making your smaller branches. We started off by making a short line that has to be quite strait. Clicking your main trunk and holding shift and moving it away will create a copy of it without doing anything to your original one. You then need to go on the path deform (WSM) and click and pick path and select the line you just made.
To create the leaves we started off by making a plane and applied the branch to it. We then added more polys and a bend modifier so they are more realistic and curved. Next we created a tiny branch and used path constraint to attach the leaves to it and duplicated them to make a small cluster to copy all over the tree.
Fence
Once i finished making the important models for my environment i started to think what other models i could add so i went back onto google and started to look into gingerbread houses again. One of the most common things that i found was fences, so i changed my research into candy fences to find a good image to work off.
I decided to try and make a fence using this image so i went into a 3ds max and experimented with different shapes to use as my fence post. After going through a various amount of shapes i decided to use cylinder as it was most similar and would be easiest to shape so it looked similar to the picture.


After i made a cylinder i converted it to a editable poly so i will be able to edit it better to make it look more realistic and more natural looking.


This is the final result of my model after editing its shape to look more realistic. I then needed to duplicate it a number of times to get the base design of my fence. My next step in working on this was the icing that holds each post together so i was going back to experimenting with different types of models to use as my icing. My first thought was to use a similar method that we done with the tree by drawing a line around it and attaching a cylinder but after speaking to my tutor he showed me a much better and easier solution. He used a sphere to and put them inside the models to act as a icing but you when you move this model in the engine it wont make a difference since the play couldn’t see it anyway. After finishing modelling it i then needed to find some textures to use on it. I decided to texture my fence similar to the picture i used to make my fence which is just a simple red and white pattern.


This is the end result of applying the textures to my UV template. 
This is the end result of my fence. Did i struggle with this? No i thought it was a rather easy model to make and is a great extra to add to my environment.
https://yarn4brains.wordpress.com/2009/12/24/daring-bakers-december/
Candy Cane
We started off by opening 3ds max and creating capsule which in the Extended primitives and making it -4.5 by 230. A thing we had to edit as well was the system unit setup so we could make our candy cane to scale with our character. The way to edit to edit the unit setup was by going to the customize tab then unit setup and in the metric drop down change that to centimeters there is also a button which reads system unit setup you need to go in there and change that to centimeters and once you done that you will be ready to start making your candy cane.
We used tools we have not used before when making this candy cane such as bend and twist. We used the bend tool to add the curve to the end of the candy cane look you would have in real life and the twist function comes later after you apply your texture.
The shape that we used to make our candy cane was a capsule as it made most sense to use, whilst making it we changed the number of height segments to 40. the next step was to texture it right away.


This is our uv template after sorting it out and preparing it for texturing. The photo on the right is the end result of texturing, we made our white colour slightly red because using white on its own does not look good at all and it makes it so the red almost blended with it.


This is the result of our capsule after adding the bend modify which means we can now add the texture we just made. Pressing M and going into the modes tab will open the material editor then you need to drag the texture you just made into one of the empty materials. Once your material is in you then just need to drag the sphere onto your model.


Your model should look like the picture on the left after you applied your texture. Once your texture is on your model we then went back onto the modify tab and added twist so our texture would wrap around our model like it really does on a candy cane.

This is the final result of my candy cane. Did i struggle with it? No we was giving very clear steps and it was fun to learn about more of the modifiers.
Limbo dub sound task.
We were first shown a short 10 second clip of some game-play of the same game Limbo. After being shown the video we were then asked to analyse the different sounds in the video so we all started to break it down. We started with the sounds you could actually see like the log sliding and the impact of the rock Etc. Another really important part of this task was discussing the ambiance sounds. Once we had analysed all the different sounds in the clip we then had. We then had a list of the different sounds that had happened during the clip.
Our next part was we was put into pairs and then all given three pieces of paper and our task was to be able to make the sound effects from the limbo scene only using the pieces of paper we were given. We then had a ten-minute session on experimenting with the paper and trying to make different type of sounds. After experimenting with the paper we were then introduced to a recording device called (NAME), we were then shown how to operate the device and the best settings. There were two formats you could record with in the device MP4 and WAV, we used WAV as using MP4 would compress the file and make it lose some quality.
Our next task was to discuss the suitable type of areas to be able to record all of our sounds like it would need to be a very quiet place with minimal background noise. We then found a suitable place to start recording so we then began recording a few tests to see what the input and output volume was like and then using our the list we had made for the different sounds we began recording and making our sounds.
After we had recorded all of our sounds we had to figure out how to be able to put them over the video but before we could do that we would need to edit the sounds we recorded. We transferred them over to a PC using a mini USB cable. Once they were all on the PC we used a program called audacity which is a simple yet very effective tool for editing audio, we used it so we were able to crop the audio we had the exact part of the file we wanted. We done this sam e procedure for all of the files we had recorded. Organizing the files is a very important as you could have different copies of the same sound so you would need to organize in a way that would make sense and wouldn’t be hard to understand (The picture on the left shows an easy and neat way to organize files. After having all of our clips edited when then needed to know how to be able to put it over the video so we were introduced to a program called Adobe Premier, the first thing we done with this program was import the original video but without the audio which is an option when you first import it. After importing all of our edited sounds we began lining them all up with the video as best as I could to add a good effect to the video.
Foliage
For this task we were asked to research foliage found in places like woods and a forest because we was going to make some of our own to be able to use in our Hansel and Gretel environment.

We then went onto to textures.com so we could make our own foliage 


Finding good plant textures I found hard because most of the available one seemed quite similar and a large amount of them didn’t have a specular map which narrowed it down even it more. Making the planes was rather easy to do as there wasn’t a lot of steps involved so you couldn’t do much wrong. I didn’t learn any new techniques with this as we used tools we had previously learned.
Foliage in games.
What is Foliage?
Foliage is plants and trees that are in the games. Foliage Is used in all games whether its 2d or 3d, It has been in older games as well such as Sonic when they use palm trees which is still foliage or even the spyro games when they had the grass and bushes.

When you look at foliage in modern games the comparison is amazing when you compare to real life it’s amazing to see how far we have come and realism in games today. This is a screenshot of one of the latest games called Crysis 3. Foliage is used almost everywhere in the game and is a big part of the in game graphics.

As you can see this graphics in this game are very realistic and very impressive. If you compare this screenshot to an older game such as Ashes: Two worlds collide you can see the difference and improvement, we have made with Foliage. The Foliage in Crysis is extremely realistic and has come an extremely long way.

This is a screenshot from a game in 2007 called Runescape. The foliage is rather good for the time it came out and is used in a lot of area in the game as the trees are a big part in game as the change throughout the game depending on where you in the game.

Slain is a 2d game that uses Foliage but not normal green trees and grass, they use mostly dead trees and dead grass which makes sense as the game is a horror type game. The trees in this game are like this to have an effect on the user when playing the game. Trees in this take quite a lot of the background space as they are also used as a main source for the graphics in game.
Conclusion
I think foliage has a very big part in any type of game you play as it sets an environment for the player and is also used to make the game look nicer or match the art style of the game. Using foliage in different types of game is very useful like if you were using it in a horror game you could make it so the trees and grass were dead which adds a creepy, spooky atmosphere. You could even dead trees in a game such a fallout as most of it is a wasteland. Adventure and open world games tend to have many types of trees for different season as well, you can have some winter trees some places and summer
2.1
What is 3D modelling?
3D modelling (three-dimensional modeling) is a a key part in games. It gives the player an idea of how to feel whilst playing your game. Its what makes the entire the game, game-play and story. Two games i’m going compare are Dead by daylight And borderlands 2. Dead by daylight is a survival horror type game and Borderlands 2 is a action role playing game. Both of the games use their art style and models to give the player a certain feel whilst playing the game.
The models in Dead by daylight are some what shady and dark because the game is trying to set the mood of a horror game. The lighting of this game is very dark, dim and gloomy which works well with the genre of this game. The models used in this game are extremely lifelike which is expected of this game since the blood and gore plays a big part in the horror of this game. Atmospheres in horror games typically tend to be dark and eerie so that’s why dead by daylight has this type of scene. It makes players feel immersed in the game with a feel of being followed.
Borderlands 2 is a game that’s much different from Dead by daylight. It’s a a action based Role-playing-game that has a unique art style to the game. Everything in Borderlands is usually lit up and there is always something going on to keep the player involved with the game since it is an action based game. The theme of the game is using a cartoon art style which hasn’t been use in other games typically other than Borderlands 1 and 2. I feel like the art style and lighting of the game work well with the player and making them feel immersed within the game. Looking at this screenshot you can see that all the important parts are all bright to keep the player into the game. The texturing work well with the game because of the type of game it is as its just an action but there is still a nice amount of gore and violence.

2.2
Sound Task 21/9/2016
The sound techniques that were used in this is that to add the effect of the creaking wood would involve stepping on some old wooden floors that would give you that nice creaky sound and a more realistic feeling whilst playing. There is almost a slight whole creaking of the bridge and not just the foot steps which adds a better effect to it all. You can hear wind whistling in the background, through the trees. Making the scene feel real and giving it more character. It also works well with walking across the bridge as that is the sort of atmosphere you would get when walking across one.
The clip walking through the woods has many more sounds going on. The wind is much louder as you are surrounded by more trees and its as if you can hear the wind passing through directly. The sound of the grass has a faint rustling but also with the wind still passing through it which adds much more of a atmosphere to the area and environment. The sound of footsteps changes throughout the game-play for the wood it has a but of a stump but with the added of effect of creaking. Walking on the rail-tracks is a mix of sudden and soft because of the dirt being in-between the tracks adds the exact same effect you would in real life. The music used fits perfectly with the game as the game is a investigation type of game and its a kind of calm and mysterious type of game.
With this popular scene from the first Lord of the rings movie there is a lot more than meets the eye in this scene as there is a lot of clashing of the uruk-hai’s armor in this scene etc. When the scene first starts you can just about hear the river which is near the location where they are, its a nice effect to add to the scene. You can hear a faint rumbling in the background from where the rest of the uruk-hai are following, to make that sound I can’t really think of a perfect way to do it but maybe it could involve hitting a table or something as that could create that kind of rumbling sound.
Clashing of armor and weapons happens all throughout this scene and it seems like a simple sound you could make as you could hit two pieces of metal together, using different types of metals could also be able to create different type of sounds effects. With roaring/ growling sound the uruk-hai make their is lots of type of animals that could make that sound for instance a Tiger, Lion and at one part there is almost a hissing type sound made by one of them which can easily be done by using a Snake or Cat for instance.
Music in this scene goes well as its a sort of dramatic scene and the music is a bit intense and has you wanting to watch more and more and keeps you more intrigued.
Comparing these two videos might be weird but the sounds used in this are both made easier than you thought. Both with constant background noises throughout the entire video and different sounds depending on what’s going on in the scene.

December 8, 2016 at 12:00 pm
You have some evidence of your understanding of the processes involved in creating 3D models and sounds. You have not put up any of the other models you created such as the candy cane, gingerbread man, cookie, tree or anything on using Unreal Engine 4. You need to get a few of these processes explained at least. This is not good enough at the moment and requires some serious work and focus. The models you do have evidenced are satisfactory quality so you must demonstrate more focus and allocate more time to making models in future.
LikeLike
December 8, 2016 at 1:37 pm
I have made a start on the gingerbread and tree so i should be posting them in the next few days.
LikeLike
December 8, 2016 at 1:38 pm
As for the gumdrop and lolly they was both done at home since I was having multiple problems with making the lolly.
LikeLike
December 8, 2016 at 12:16 pm
You had some reflections on your models but you mentioned the lollipop was more difficult than your gum drop which shouldn’t be the case as the lollipop should have been just two cylinders.
LikeLike
December 8, 2016 at 1:35 pm
Personal opinion, I just found the gum drop easier overall.
LikeLike
December 12, 2016 at 6:38 pm
You described the dark nature of Dead by Daylight as it is trying to create a horror theme. You contrast this against the bright and saturated cartoon styled environment seen in Borderlands 2. In future assignments i suggest you go deeper such as looking at environmental lighting and also explaining why you think they made their design choices.
LikeLike
December 12, 2016 at 6:42 pm
You described the dark nature of Dead by Daylight as it is trying to create a horrow theme. You contrast this against the bright and saturated cartoon styled environment seen in Borderlands 2. This shows some level of understanding of how 3D is used to create meaning. In future assignments i suggest you go deeper such as looking at environmental lighting and also explaining why you think they made their design choices.
LikeLiked by 1 person
February 15, 2017 at 2:51 pm
Jenni Blackman Marking referred unit 1 – the work is here Josh – at last! please try and do your best to submit the work on time and then you are in a position to give each piece of work an equal amount of time and effort and not have to rush it. You don’t want to receive a lower grade because your work was late.
LikeLike
February 15, 2017 at 2:53 pm
After what just happened with unit 1 It won’t happen again.
LikeLike